Showing posts with label Good Eats. Show all posts

Thursday, June 28, 2012

Favorite Recipe: Sante Fe Skillet

My mother has some recipes that she has made FOREVER and therefore they are some of my favorites. There were several recipes that I took with me to college and now re-create in the Foster home. One of these is Santa Fe Skillet.

Santa Fe Skillet is cheap, quick, easy, absolutely delicious and not to mention healthy. Yep, you heard me, its a Weight Watcher's Recipe, and you would NEVER know! After feeding this to Greg, I let him in on the secret that it was a Weight Watcher's recipe and he was shocked! So, needless to say, this is one that the men absolutely LOVE!


What you need:

  • 1 lb ground beef
  • 3/4 cup onion, chopped
  • 3/4 green pepper, chopped
  • 1 can Rotel, drained
  • salt & pepper, to taste
  • 1 1/2 cup instant rice
  • 1 1/2 cup beef broth
  • Grated Mexican Blend cheese (or cheddar)

What to do:

In a large skillet, brown the meat with the onion and green pepper. Once browned, drain the grease off of the meat. 

Add the rotel, salt and pepper, instant rice, and beef broth to the skillet. Immediately cover with a lid. Reduce the heat to low and simmer for 5 minutes. Sprinkle the grated cheese on top and re-cover for two minutes. Once the cheese has melted, serve with tortila chips and a salad. Viola!

Monday, June 25, 2012

Favorite Recipe: Raspberry Pretzel Dessert Bars

Photo Courtesy of: BeckyBakes.net
So what do you do when you visit the grocery store and it's "buy one package of Raspberries, get two free"? You buy them of course and immediately go to Pinterest to find some recipes involving Raspberries. At least that's what I did. After perusing several recipes, I decided to try these Raspberry Pretzel Bars because well, they involved cream cheese. And whipped cream. COUNT. ME. IN.

Good news: Tom Thumb has the same Buy One, Get Two Free deal going all week!! I might be making another batch.... :)

What You Need:

  • 1 1/2 cups crushed pretzels
  • 1 cup sugar
  • 1/2 cup butter, melted
  • 8 oz. pkg cream cheese, softened
  • 8 oz. container cool whip
  • 6 oz. package raspberry jello
  • 2 cups water, boiling
  • 24 oz. raspberries (frozen or fresh)

What To Do:


Preheat oven to 325.

Crush enough pretzels (about 3 large handfuls) to make 1 1/2 cups of pretzel crumbs. Combine in a bowl with 1/2 cup sugar and your melted butter. Once well mixed, press into the bottom of a 9x13 pan. Bake for 6 minutes and then let cool.

In a separate bowl, cream together the softened cream cheese and the last 1/2 cup of sugar. Once well mixed, mix in the container of cool whip. Spread on top of the cooled crust with a spatula.

In yet another large bowl, pour 2 cups (2 1/2 cups if using fresh raspberries) boiling water over the package of raspberry jello. Whisk until the jello powder is completely dissolved. Once dissolved, add your raspberries and mix well. Place bowl into the freezer for about 1.5-2 hours, or until the mixture turns into the consistency of an egg white. Pour over the creamy layer. Refrigerate until the jello has set. Best if left untouched overnight!

Sorry for the ugly corner where Greg and I taste-tested this before approving!

Wednesday, June 20, 2012

Quick Cajun Chicken Penne

For one of my Christmas presents, my Grandmother gifted me with a year-long subscription to Taste of Home. At first, I was not excited about this. To the point that I left the first magazine in the wrapper for like a month. But, after finally deciding that I should at least look at it, I opened it, and to my surprise, ended up ripping out 10 pages of recipes I wanted to try. This magazine has transformed from something I thought was lame to something that I look forward to receiving in the mail every month! I've tried some recipes and look forward to sharing!

Photo Courtesy of: Taste of Home
Serves: 6
Prep & Cook Time: 30 minutes

What you need:

  • 1 lb penne pasta
  • 4 chicken breasts
  • cajun chicken seasoning (I made my own!)
    • 4 tsp cayenne pepper
    • 3 tsp salt
    • 2 tsp black pepper
    • 2 tsp cumin
    • 2 tsp paprika
    • 2 1/2 tsp dry mustard
    • 1 tsp dried thyme
    • 1 tsp dried oregano
    • 2 tsp onion powder
    • 2 tsp garlic powder
    • 2 tbsp Old Bay Seasoning
  • 1/4 cup butter, melted
  • 2 10 oz. containers refrigerated Alfredo sauce (I used Bertoli)
  • 2 plum tomatoes, chopped
  • 3 green onions, thinly sliced

What to do:
Cook the pasta according to package directions. Melt your butter, and dip your chicken breasts in the butter and place on a plate. Sprinkle with the cajun seasoning and cover on both sides of the chicken. Grill the chicken, covered, over medium heat for 5-8 minutes on each side. Once cooked, cut into bite size pieces.

On the stove, heat the 2 containers of Alfredo sauce until warm. Once warm, toss with the cooked pasta, chicken, chopped tomatoes, and sliced green onions. TA-DA! 


***Warning, this recipe does have a bit of kick to it, so beware if you're not the biggest fan of spicy foods. Being someone who LOVES spicy food, this was pretty mild for me, but absolutely delicious. LOVED the flavor of this one! Enjoy!

Friday, June 15, 2012

Southwestern Stuffed Peppers

**Recipe Adapted from Simplylovefood.blog.com


Found this recipe and was skeptical that I could get the hubby to eat these. After looking at the ingredients, I knew I'd have no problem convincing him that these would be delicious. And that they were! Not to mention, each pepper only has about 375-400 calories. AKA, I eat one and Greg eats two. Win!

Serves: 10 (AWESOME for leftovers!)
Total Prep & Cook Time: About an Hour

What You Need:

  • Olive Oil
  • 1 lb lean ground beef
  • 1 cup chopped onions
  • 2 heaping tablespoons homemade taco seasoning (or the packaged kind)
  • 2 cups cooked rice - I used Minute Brown Rice
  • 5 large bell pepper, cut in have and seeds removed
    • I used 3 and did 2 poblano peppers since my hubby is picky about his peppers!
  • 1 can black beans, drained and rinsed
  • 1 cup frozen corn
  • 1 (15 -16 oz) jar of salsa 
  • Shredded Cheddar Cheese
Toppings:
  • Sliced Avacado
  • Sour Cream

What to Do:

Pre heat the over to 400 degrees. Once all of your peppers have been sliced and seeded, lightly coat the peppers with the olive oil and roast in a 9x13 baking dish about 20-25 minutes. 

While the peppers are cooking, brown your meat, cook your rice, and chop your onions. Once the peppers are done, remove the peppers from the oven. In a very large bowl, combine the cooked ground beef, chopped onions, taco season, rice, black beans, corn and salsa. Stir and mix well.

Carefully spoon the mixture into each of the peppers. You will have enough to make them almost overflow. Cook the peppers for another 15-20 minutes. 2 minutes before they are done, remove the peppers and sprinkle the tops with cheddar cheese. Place back in the over for 2 minutes or until the cheese has melted.

Remove from the oven. Top with some avocado and a dollop of sour cream!  


Wednesday, June 13, 2012

Meal Planning


One of my least favorite things is to go to the grocery store. I'm a one trip a week kind of girl. If I need to go more than that, I tend to default and just go grab a bite to eat from a restaurant or fast food. A habit that I was more than ready to get rid of post-college.

Getting married and being a wife now responsible for feeding my always-hungry husband, that whole eating out thing had to change. A) It gets expensive. B) Eating out isn't necessarily the healthiest option (gotta keep up with the LGN diet, ladies!). C) Contrary to grocery shopping trips, I actually enjoy cooking and making creations in the kitchen!

So, to make eating dinners at home and packing lunches actually work, I was able to use my organization skills and create a meal-planning method that works for us. We've been doing this for several weeks now and it has saved us from several grocery store trips a week as well as many restaurant bills! Not to mention, when I get home from work after sitting in traffic for a while, I never have to waste time thinking about what to cook for dinner. It's already planned and I can immediately start cooking!

I started with just planning dinners, but after many weeks of running out of cereal mid-week, or not having anything for lunch and having to go out to eat, I changed my strategy and now plan all of our meals. Its more of a strategy to make sure that we have enough food to allow us to make it though a week, and it works! I plan my meals and sides before we head to the grocery store and then make my list accordingly. Your grocery bills might increase a tad, but the free time you have throughout the rest of the week is totally worth it. Since this method has worked so well for us, I wanted to share the spreadsheet you'll see on the front of our fridge each and every week!

If you try this out, let me know how it works for you! You can download it here.

Sunday, May 13, 2012

Easy Banana Pudding

Picture Compliments of: myrecipes.com

This recipe was a favorite in my household growing up. Actually, this recipe caused a lot of feuds in my house. If you weren't home when the banana pudding was pulled from the refrigerator after being chilled, there was a very high possibility that there wouldn't be any left over for you to eat later (thanks my loving big brother).

Anyways, I was craving some of my mother's infamous banana pudding this past week, so I pulled out the recipe and whipped some up. Delicious. Now I'll only have to feud with the hubby to see if he'll leave me any.

What You Need:

  • 1 cup sugar
  • 3 tbsp flour (heaping)
  • 2 eggs
  • 2 1/2 cups milk
  • 1 tsp vanilla
  • 2 bananas (sliced)
  • Vanilla Wafers

What To Do:

  • Mix the sugar, flour, eggs, and milk into a large microwave safe bowl. 
  • Put the bowl into the microwave and cook for 8 minutes, stopping every 2 minutes to whip.
  • Once the mixture has cooked for 8 minutes and is nice and thick, add the teaspoon of vanilla and stir it in.
  • In another large serving or trifle bowl, layer the following :
    • Vanilla Wafers
    • Pudding
    • Bananas
    • Vanilla Wafers
    • Bananas
    • Pudding
    • Vanilla Wafers
Enjoy! I promise that it won't disappoint!

Thursday, April 26, 2012

The Most Delicious Chicken Spaghetti

I mean it when I say it, this is the best Chicken Spaghetti recipe known to man.

A good friend of ours, William, ended up living with Greg in college for a summer while taking some summer classes. After coming back from visiting his mom for the weekend, William's mom sent him back to school with massive serving of this delightful little dish. After graciously sharing his meal with Greg and I, I told him that I HAD to have the recipe because it was scrumptious and unlike any chicken spaghetti I had ever had.

I cooked this spaghetti earlier this week and got rave reviews. Not to mention, when I ate it for leftovers the next day in the office, the girls I ate with were extra jealous of my delicious smelling lunch. They too asked for the recipe which hence spurred my decision to share it with the world.

You can thank me later....

Picture: Compliments of Taste of Home
This is NOT the same recipe, but by the time I realized I could have used a pic of my
own recipe, it was ALLLLL gone.
Oops. :)


Chicken Spaghetti
Serves: 6

Ingredients:
2 ½ cups cooked spaghetti
3-4 medium boneless chicken breasts – cooked & shredded
½ cup diced pimentos (2 oz)
1 small onion – finely chopped
2 cans cream of mushroom soup
2 cups chicken broth
1 dash garlic, salt & pepper
3 ½ cups grated Cheddar Cheese (or Monterey jack, or Velveeta)
            -Save ½ cup for the topping
1 can Rotel (tomatoes and green chiles)
1 package French fried onion rings

Directions:
Mix broth and soup in a large bowl (everything is going to be added to this bowl so make sure it’s a big one!). Mix in everything else. Pour into 9x13 dish. Bake at 350 degrees for 35 minutes. Put cheese and French fried onions on top and bake 10 more minutes.

Enjoy!

Monday, April 9, 2012

Two New Blogs I'm Obsessed With

I have recently come across two new blogs that I am absolutely obsessed with.


 The Dating Divas should be a blog added to every girl's Google Reader. I know their slogan is "Strengthening Marriages One Date at a Time", but this website is full of blogs applicable to any woman.

If you're married, you'll see why I love this blog. It's all about being creative to keep the romance alive both in and out of the bedroom. They've got TONS of cheap date ideas that are perfect for those of us trying to survive by pinching pennies! Not to mention, if you're like me and like thinking out of the box, then their overflow of creative ideas will never stop to entertain you. I came across this blog late last week and cannot wait to start incorporating some of these ideas into the weekly date nights in the Foster Home.

If you're not married and either single, dating, or even engaged, their are still tons of good blogs for you to check out. While it's fun to read all about the "intimate moment" ideas that you can honor your future husband with, they have tons of posts about new make-up tricks, birthday gifts for guys, and even recipes to try. Enjoy!


Six Sisters' Stuff is another blog that I've found myself spending a lot of time on. With my love of food (both eating and cooking), crafts, and decorating, this blog has got it allllll covered. I can't wait to try some of these recipes, especially these Slow Cooker Scalloped Potatoes! Mmmmm, Yum! As you scroll through their posts, you'll find that I have this blog to credit for finding The Dating Divas blog above. Again, I love blogs that can point me to other blogs that I can fall in love with.

Both of these blogs have the  business models that I would someday love to copy. A bunch of friends (or sisters) all coming together to create a dynamic blog that has posts about food, crafts, dates, cool finds, helpful hints, reviews, etc. Maybe this is where life will take me eventually. Anyone want to join?! 

Hope you enjoy these as much as I do!

Wednesday, April 4, 2012

Sauteed Chicken with Mushrooms & Asparagus

Photo courtesy of MarthaStewart.com

This has been a week of good eats in the Foster Household. I love branching out and trying new recipes. Some have been disgusting, some have been okay (but probably won't make again), and some have been fantastic finds. Like this little gem we tried last night. Best of all, this is a super lean meal that is incredibly healthy!!

***Disclaimer: I get weary of trying "super healthy" meals, because well, I'm from the South, and I like to eat Heavy Whipping Cream and Butter. To me, most "healthy" meals are uneventful and rather bland. Not a fan. Have no fear, this is one that you'll be sure to love. I fed it to my used-to-be-non-veggie-loving husband and the first words out of his mouth.... "Now this is delicious!". So enjoy! Not only am I providing you with a safe way to branch out from the typical meals you might tend to always make, but I'm also helping you with that not-so-new New Year's resolution of being healthy! You're welcome....

What You Need:
  • 1 tablespoon olive oil
  • 2-3 large boneless, skinless chicken breasts, cut into 1-2 inch bite size pieces
  • Coarse Salt and ground pepper 
    • **Spring for actual "Course Sea Salt" next time you're at the store if you already don't have some. I usually think that normal salt will do the trick, but I finally caved and made the purchase, and boy did it work wonders!
  • Italian Seasoning (or really any kind of seasoning that would just add a little something extra to your chicken. Not a kitchen pro? Try lemon pepper, a table blend, etc.)
  • 1 carton button mushrooms, trimmed and thinly sliced
  • 1 bundle of asparagus, tough ends removed
    • **Know how to effectively remove the tough ends? My friend Erin showed me a neat trick! All you have to do is bend the asparagus and it snaps off in the perfect place! Genius!
    • **The original recipe says to cut these into 2-inch lengths. I missed this and just cooked them whole. Personal preference!
  • 1 cup water
  • Cooked noodles or Rice (optional)
    • **I used a package of egg noodles and found it to be quite fitting.
What to Do: 
In a large skillet, heat oil over medium-high. Season chicken with salt and pepper once cut and before placing in the skillet. If you have a lot of chicken, or a smaller skillet, cook in two batches, turning occasionally, until browned (6-8 minutes). Transfer the chicken to a plate.

Without turning the heat down, add the mushrooms, asparagus, and 1 cup water. Season with salt and pepper as you see fit (I also added some "Italian Seasoning" that I found on our Spice Rack. The original recipe didn't call for this, but again, I'm from the South and love my food to have flavor and was nervous that the salt and pepper wouldn't cut it). Cook, tossing once and scraping up browned bits, until vegetables are crisp-tender (or the mushrooms have browned and the asparagus is a good shade of Kelley Green). This should take about 4-6 minutes. Add the chicken back in with the veggies, cook, tossing, until warmed through, about 2 minutes. Serve on top of noodles or rice, if desired!

What We Paired it With:
Since this is an all-encompassing meal with your carbs, lean meats, and veggies, we just paired it with a massive delicious fruit salad filled with a banana, strawberries, blueberries, mandarin oranges and even some tiny marshmallows. (The marshmallows was how my mom tricked us into eating fruit salad when we were younger. Yes, I am an adult and still love eating it that way. Don't judge me.)

Tuesday, April 3, 2012

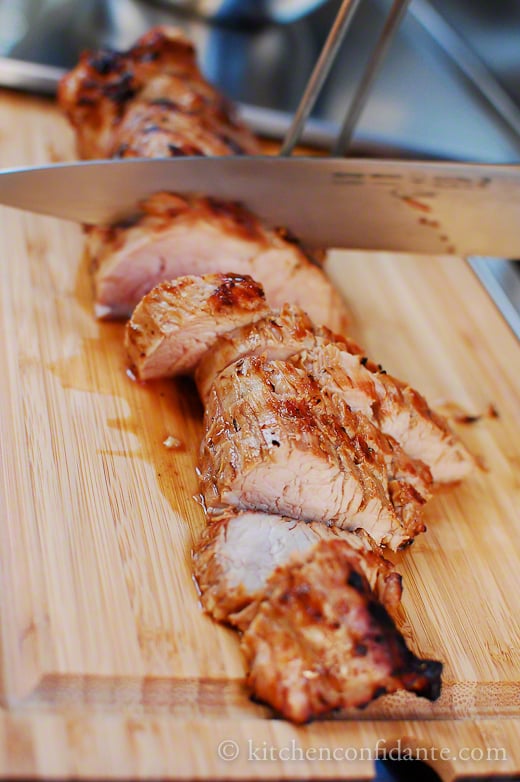
Grilled Balsamic Pork Tenderloin

Photo Courtesy of Kitchenconfidante.com


Last night, Greg and I took our first adventure in grilling a pork tenderloin. I was a little intimidated as it was a more expensive cut of meat and all the reviews say that if you do it right, its one of the juiciest and tender pieces of meat that ever existed. Eek! No way I could mess that one up! Therefore, I pawned the job off on my grilling stud of a husband. Seriously, he has mad skills. And needless to say, he cooked the meat flawlessly. So flawlessly, that the meat was indeed some of the juiciest, tender, and melt in your mouth meat that has ever been cooked in our tiny humble abode. SO good, that this recipe will be one that is written on a recipe card and filed away in the recipe box. And shared with the world, naturally. 


Again, found this recipe on Pinterest (surprise, surprise) and it was SO easy! Not to mention, it can either be grilled or baked, depending on your access to a kitchen/grill. 


What You Need:
  • 4-5 garlic cloves, finely minced or crushed
  • 2 tablespoons balsamic vinegar
  • 2 1/2 teaspoons coarse salt
  • 1/2 teaspoon freshly ground pepper
  • 2 tablespoons olive oil
  • 2 pork tenderloins (about 1 1/4 pounds each)
  • 2 tablespoons canola oil 

What To Do:
Stir together garlic, balsamic vinegar, salt, pepper, and olive oil in a small bowl. Rub the paste all over the pork. If you like or have the time, marinate overnight. If not, no worries, it will still be great!
      ***I chose to marinate mine all night and just dumped everything in a large Ziploc baggy. Once I made sure that everything was mixed, I put the pork in and made sure that it was covered. If you're going to be putting it in a baggy to marinate it, make sure that all the air is out of the bad completely before you seal it. It also won't hurt to double bag it in case you spring a leak. Put it in the fridge and let it sit! 

Grill Preparation:
Sear the tenderloins on all sides then grill for about 20-30 minutes, rotating every 10 minutes, until the internal temperature is 160 degrees. Try to let it rest before slicing.

If you're a grill novice like me, then you might wonder how to "sear" the meat properly. So I looked it up. Lucky for you, I'll give you the brief run-down of how it goes:
  1. Clean your grill
  2. Oil your grill with Canola oil (not olive!). It's easiest to just put some on a paper towel and rub it over the grate.
  3. Turn your grill on its highest setting
  4. Let it Pre-heat
  5. Put your meat on, and quickly close the lid. Rotate it after a minute until all sides are seared.
  6. Turn your heat down to commence the rest of the grilling. We had to turn ours down to almost our lowest setting in order to not over cook the meat.
Oven Preparation:
Preheat oven to 400 degrees.

Heat canola oil in a large, heavy saute pan over medium-high heat. Working in batches if necessary, add pork, and brown all over, about 4 minutes. 

Transfer pan to oven. Roast pork, turning occasionally, until the internal temperature is 160 degrees, about 20 minutes. Transfer pork to a cutting board, and try to let it rest 10 minutes before slicing. 


What we paired with this meal:
  • Sweet potatoes (we chose to load ours us with butter, brown sugar, and marshmallows. Reallllllll healthy. We know.)
  • Boiled Broccoli
  • Sister Shubert's Wheat Dinner Yeast Rolls. A regular dinner favorite at our house. 
Enjoy!

Tuesday, March 13, 2012

Lowfat Oatmeal-Banana-Apple Muffins


Tried these little babies out last weekend and they were a win. Not only were they delicious, but guilt-free and healthy! Not to mention, with the apple and banana in the muffin, they stay super moist! Everyone who has tried them commented on how delicious they were.


Why I'm a fan: Healthy, Delicious, Not overly sweet like a ton of muffins can be, Filling.


Makes about one dozen.

Mix together and set aside:

1 1/2 cups oatmeal
1 cup flour
3 tsp baking powder
1/2 tsp salt
1 1/2 tsp cinnamon
1/2 tsp nutmeg

Beat together until fluffy:

2 eggs
4 tbsp vegetable oil
6 tbsp sugar

Blend in:

2/3 cup milk

Fold in the dry ingredients and when the flour is almost incorporated fold in:

1 cup mashed ripe banana
1 cup grated apple (approximately one large apple)

Do not over mix. Fold in only until the fruit is mixed through the batter.
Spoon into greased or paper lined muffin tins and bake at 350 degrees F for 20 -25 minutes (**Mine only took 20 minutes) or until a toothpick inserted in the center comes out clean. Serve warm.

Wednesday, March 7, 2012

Restaurant Review: Torchy's Tacos

5921 Forest Lane  Dallas, TX 75230

All I can say about this one is YUM! I was recently introduced to this casual restaurant by a good friend of mine and I frequently crave it!

Food that I've tried and a HUGE fan of:

  • Green Chile Queso
    • Not your typical queso! Okay, it is like queso but its spicy with a dollop of guacamole in the middle drizzled with some sort of pepper sauce. To die for. Definitely worth extra calories!
  • Fried Avacado Tacos
    • Again, delicious. I love avocados, so the fact that they made a taco out of them is even better. Good news, it vegetarian friendly.
  • Chicken Fajita Taco
    • Seasoning on this and the beef fajita taco are impeccable.
  • Beef Fajita Taco
  • The Republican
    • Greg ordered this one last time we were there. Disclaimer: its not ground up sausage but more a sausage link. Greg referred to it as a Mexican Hot Dog. haha! He liked it, but it wasn't exactly what he had in mind when he ordered it!
I don't know much about the history of this restaurant, but when using Google to find the image above, I found that they have sold tacos out of a trailer! Not to mention, you can find one of these in Dallas, Houston, and Austin! If you like gourmet tacos, I don't think you'll be disappointed. 

Sunday, March 4, 2012

Sunday Brunches


Today was our first day to ever experience a Sunday Brunch in Uptown! Let me just say, it was delicious and as expensive as one of our regular date nights. Oops.

I know some of you might be thinking, how did they get to do Sunday Brunch in Uptown? Isn't Greg working at a church in Keller (over an hour a way from Uptown)? Well, my friends, its time that I update you on some of the changes that The Foster house has been experiencing.

To make a reaaalllly long story short, Greg was recently given the opportunity to come on board with a missions foundation that raises money to send missionaries and churches out all over the world. It was/is an incredible opportunity to spend some time using his gifts towards something that he is extremely passionate about, while continuing to serve The Exchange DFW. After investing some time doing both jobs, the pastors at The Exchange, as well as Greg, decided that it would be best if he chose to do only one job and fully invest all his time and energy into the job that he chooses. So, that meant that a decision had to be made. Which one do we choose while remaining faithful to what God has called Greg to do as a minister and as a husband and leader of our household?

We spent much time in prayer separately and together and can honestly say that this has been one of the most precious times for us a couple since we have been married. Not only are we still having to figure out this whole being married, sharing a budget, house, food thing, but we truly had to rely on faith and acknowledge that God's Will is what is best for our lives. We had to take a leap of faith. And we had to do it as one.


When we got married, we set Colossians 3 as a precedence over our marriage. There are several reasons why we were drawn to this passage in particular, but v. 17 spoke to our situation:
"And whatever you do, in word or deed, do everything in the name of the Lord Jesus, giving thanks to God the Father through Him"       -Colossains 3:17 

Even though Greg is an extremely talented worship leader, this verse shed light on the fact that Greg is called to glorify God in every situation, regardless of weather he was leading a church or not.

After much prayer, hard conversations, and tears, we truly felt discernment that God was calling Greg to be apart of the mission foundation in Plano. Greg is called to be a minister to the Gospel and has been blessed with a numerous amount of gifts. This new opportunity is not denying his God-breathed talent to lead worship at a church, but is for the first time in 10 years giving Greg a way to use some of the other gifts and talents that he has been given.

Does this job change mean Greg is done leading worship? Absolutely not. We did not desire to leave the people at The Exchange (as this is why the before-mentioned tears were shed) as we truly did form some great relationships with people at that church that we desire to stay friends with throughout the rest of our lives.  At this point in our marriage and our lives, we want to get re-group, and spend some more time focusing on us growing together. I do not feel this is something that we did well in the first 7 months of our marriage so we're taking this opportunity to explore new churches and grow alongside one another.

With that being said, today was the first Sunday since I've known Greg that we either weren't on vacation or he didn't have to work. That means that its been over 4 years since we have had a "normal" Sunday together! We literally don't know what to do. hah! Needless to say, we were able to go to an early service, join our friends in Uptown at Breadwinners (yep, our first time for that too), run some errands, nap, enjoy dinner, do some chores, and literally just have an extremely relaxing day. It was wonderful.

I know it will only be a matter of time before Gregory is called to serve at a church, so in the meantime, I'm cherishing our upcoming Sundays together.


Saturday, January 28, 2012

A Restaurant I Forgot to Mention

After I presented the list of Restaurants in Dallas that Greg & I have grown fond of, Greg quickly reminded me that I forgot a big one. Oops. So, here is an additional suggestion, not as an honorable mention, just merely #6 to my prior list.


6. Whiskey Cake Kitchen & Bar
  • This is an urban-sleek restaurant that Greg and I have visited on two different very special occasions: His Birthday and our 6th Month Anniversary. Whiskey Cake has an amazing atmosphere of wood, metal, dim lights and those cool lightbulbs where you can see the actual wires glowing inside. Not to mention, all of their veggies and foods come from local farmers so that it is as fresh as it can be. I cannot say enough good things about this restaurant. The atmosphere and deliciousness of the food sealed the deal for Greg and me. This one will definitely remain on the top of our lists of favorites in Dallas. **If you venture out here, you HAVE to try the "Three Little Pigs" on the appetizers menu. I actually eat them as my meal. TO DIE FOR!! 

Thursday, January 26, 2012

5 Dallas Restaurants You Should Visit

If there is one thing that Greg and I love to do all the time, it is definitely to eat. We love food. We love discovering new restaurants, trying new things, and just learning to appreciated the complexities of nice dishes and drinks. We currently live in a city that's 4.35 square miles (in the middle of Dallas), and in that tiny little footprint, there are over 170 restaurants. It's insane. So, because of that I just wanted to share some of the favorite places that we either frequent, or have visited and are dying to go back! In no particular order:

1. Uncle Julio's - Fine Mexican Cuisine
  • This has always, always, always been one of my favorite Mexican Food Restaurants. If you are craving some good fajitas, or queso, or even some delicious Sangria Swirls, I would recommend Uncle Julio's in a heartbeat! It is definitely a little bit more expensive that your average On The Border, but you WILL NOT be disappointed. When El Fenix was named "Best of Big D" for their margaritas and food, we were severely confused as our experience at El Fenix was sub-par. Regardless, Greg and I frequently go to Uncle J's and share some fajitas and some queso and it is easily enough to feed the two of us. This makes me hungry just thinking about it!


2. Houlihan's - Restaurant & Bar

  • This restaurant is located less than a mile from our house and Greg and I had driven by several times before we decided it was time to venture out and try it. Again, this restaurant offers an amazing assortment of good eats and drinks. When classifying or comparing this restaurant, I would say its similar to a Chili's in that it has a bunch of different types of dishes, but the quality and presentation is more like an upscale restaurant. YUM! We've only been there once, but I had one of the most delicious Entree Salad's that I've ever had in my entire life. I cannot wait to go back!

3. Nick & Sam's Grill
  • Not to be confused with the original Nick & Sam's Steakhouse, this is another "Upscale Chili's" that is to die for. Greg and I recently went here with our "Best Couple" from our wedding, Will and Neely, to celebrate Will's Graduation, Will's moving to Dallas, and just a celebration of good time with friends. I'm pretty sure that everything we tried, we loved! This can get pricey if you go all out (which we did in lieu of all the celebrations) but would make a great date night venue if you're looking for a upscale experience at less-than-upscale prices. 

4. The Pearl Cup - Coffee & Espresso
  • Oh My Goodness. Greg and I went here one day when we were visiting Milk & Honey Boutique as it was literally two doors down from the shop. It was a cold and rainy day and their signature Pearl Cup Latte was the perfect accessory for the weather. Voted "Best Coffeehouse" in Dallas, I could clearly see why. It was chill, modern, edgy, and quaint. This definitely reminded me of all the cool and trendy coffeehouses in Seattle and I fell in love. Their coffee was delicious! If this coffeehouse was closer to our house, we would be in trouble. We would spend WAY too much time there and consequently WAY too much money. If you haven't ventured to The Pearl Cup yet, its worth the trip. 


5. Bacci's Pizzeria
  • Bacci's is literally a hole in the wall pizza place near our home that I think we discovered on accident one day. My favorite. They have Chicago pizza, pasta, & sandwiches and they couldn't be more delicious! Not to mention, they are super affordable! Greg and I can go and get two massive slices of pizza with the toppings of our choice, two salads with their homemade house dressing, and drinks and make it out of there for around $15! That's almost as cheap as Chick-fil-a (Almost)! We love this place and it's perfect for a meal out when you're on a budget! 
We are always looking for restaurant and good eat suggestions! If you have any to add to this list, let me know! 

Wednesday, January 18, 2012

Pink Champagne Cupcakes

In honor of Allison Wiley's (now Marble) recent wedding, where I dined on a delectable Pink Champagne Cupcake, I decided that I was going to attempt to make some of my own. Conveniently timed was a birthday in our LifeHouse, so I graciously took on the task of preparing cupcakes to celebrate. This birthday proved to be the perfect excuse to try out the Pink Champagne Cupcake recipe that I found on Pinterest. **These would be a PERFECT treat for any loved one on Valentine's Day!**


Here is a list of everything that you will need:

For the Cupcakes: 
1 Box White Cake Mix
1 1/4 cup Champagne
1/3 cup vegetable oil
3 egg whites
4 drops red food coloring

For the Frosting:
1/2 cup softened butter
4 cups powdered sugar
1 tsp Vanilla
1/4 cup Champagne
4 drops red food coloring


Making the Cupcake Batter

Before You Begin: Gather all of the ingredients above and attach the flat beater (used for all-purpose mixing) to your mixer to mix the batter for the cupcakes. 


Step 1: Preheat your oven to 350 degrees and line your muffin pan with cupcake liners.

I think its a must that you use "Pink" cupcake liners for "Pink" Champagne Cupcakes.

Step 2: Stir the cake batter and the champagne together until well blended.

Please disregard the empty frame in the background. Yes, we did get it for a wedding present.
Yes, we have been married for 6 month. Don't judge me. 

I left my mixer on the "Stir" setting until they were well blended. 


Step 3: Add the egg whites, vegetable oil, and food coloring. Mix on medium speed for approximately 2 minutes.


Step 4: Distribute the batter evenly to your previously lined muffin pan.


Step 5: As you can tell from the picture above, I made a mess when putting the batter into the muffin pan, so make sure that you wipe all excess batter off of the pan to avoid burning it onto your pan (and a burning smell!) while the cupcakes bake.

Nice and Clean. 


Step 6: Insert the cupcakes into the oven and bake at 350 degree for 17-22 minutes, or until a toothpick inserted comes out clean. **Mine only took 17 minutes**


Making the Cupcake Frosting

Step 7: While the cupcakes are in the oven, it's time to start preparing your frosting! First up, change the flat blade on your mixer to the wire whip in order to ensure nice and fluffy icing!


Step 8: Gather and measure all of your ingredients for the frosting. 


Step 9: Combine all ingredients into the mixing bowl and mix on medium speed for approximately two minutes. 


Yum. 

When your icing is done, it should look nice and fluffy like this.

** This icing actually makes a thick and fluffy icing that is ideally for pairing with a fancy icing bag that allows you to pipe the icing on in a very pretty way. As you'll see as you scroll down, I don't own one of those fancy things, so my cupcakes aren't as pretty as they potentially could be. Oh well. Maybe next time? Today, I was able to master baking a fancy cupcake. Next time, I'll master icing the fancy-schmancy cupcake. :)

Step 10: When the cupcakes are done, pull them out of the oven and insert a toothpick or gadget of choice (I got an awesome "Cake Tester" as a wedding gift and its perfect as we don't keep toothpicks just laying around the house!).


Step 11: Once the cupcakes are deemed done, leave them in the muffin pan for 10 minutes to cool.

Good News, the Cake Tester came out Clean!

Step 12: After the cupcakes have cooled for 10 minutes in the pan, transfer them to a wire cooling rack and let them cool for an additional 30 minutes before attempting to ice them.


Step 13: Ice and garnish those babies however you choose!!!


Ta-Da! All Done and ready to go!

These were super simple and when I was able to finally take a bite of one, I was satisfied with how delicious they were! The original recipe without all my step-by-step pictures can be viewed here.

Enjoy!

Friday, December 9, 2011

A Turkey Re-Cap


Our Thanksgiving week was so relaxing and such a nice break from the busyness of everyday life. Greg’s parents rented a BEAUTIFUL rustic house on Possum Kingdom Lake, flew in from California, and invited us and my immediate family to come out and enjoy some time together over the holiday. 

Greg and I both had to work on Monday and Tuesday, so Tuesday night, we packed up, grabbed Moose, and headed out the door to “The Chocolate Moose Lodge”. Time there consisted of sleeping in late, preparing for the big Thanksgiving meal, watching movies, playing guitar by the fire, hiking around the lake, playing lots of Texas Hold ‘Em (don’t ever play my sister in-law by the way… She’ll rob you blind!), playing Frisbee golf, and celebrating Meredith’s 23rd Birthday. It was just what we needed.

I have officially taken on the role of baking all of the pies for the second year in a row. I’ve always loved helping my mom make the pies, because I’ve always loved how beautiful they are when they are done, and I love taking pride in that art form! So anyways, I took on the task of making four pies: Pumpkin, Pecan, Buttermilk, and Apple. Let me just say, I ascertained a new level of pie making this year. They were picture perfect, not to mention absolutely beautiful. Ok, I’m done bragging. But seriously, see for yourself. Obviously, I wasn’t in the kitchen alone. I had tons of advice and help from two expert bakers/chefs: Nancy and my mom. Boy do I have a lot to live up to! 


I tried a new recipe for the buttermilk pie this year. I used Paula Deen’s “Olivia’s Buttermilk Pie” Recipe. I was a little nervous at first because it’s a crustless pie, but it turned out wonderful and was the first pie to completely disappear. 

Another favorite of the week is Pioneer Woman’s Pecan Pie. All I have to say about this one is YUM. 

A couple weeks before Thanksgiving, Meredith and I schemed and decided that everyone should dress up in traditional Thanksgiving wear for our Thanksgiving meal. Yes, I do mean pilgrims and Indians. No, don’t ask me what we were thinking. Anyways, the girls were good sports, and we even got a visit by a 6 ft. turkey! My father-in-law had the brilliant idea to not show up as a pilgrim or Indian, but to show up as the turkey himself! It was a surprise to us all, and definitely the highlight of the meal. It was ridiculously hard to take anything he said seriously when he had tail-feathers, a beak, and talons!


The day after Thanksgiving, all the kids decided to go out and play some Frisbee golf. Disclaimer: I am terrible at Frisbee golf. So bad, that I cannot even fake it and play on the wii. It’s bad. But, we all went out and braved the wind and actually had a lot of fun. I even had fun letting everyone laugh at my expense at how terrible I am. No lie. We played the 9-hole course forwards and then backwards, and I must say, I did slightly improve by the end of it. And I did have fun so I would definitely go on another Frisbee golf outing if the occasion arose.


That day was also Meredith’s birthday. We had fun celebrating her dinner that night with a gourmet meal of grilled shrimp with a honey cilantro dipping sauce, a delicious vegetable medley, and last but not least, filet mignon. Oh my goodness. Delicious. It was so sweet to be able to be around to celebrate the life of Meredith. She is the kind of girl that everyone wants to be around because she’s fun and her laughter and goofiness draw others to her.  I always love getting to spend time with her. 

This is our second annual Foster/Roberts Thanksgiving, where our families have gotten together to do Thanksgiving. Last year, we went to Austin and stayed on the river that fed into Lake Travis. Anyways, that trip was such a huge success that we decided to start a little tradition! 

My family normally just invites my grandmother over, so combining with the Fosters brings so much more fun and joy to the holidays, not to mention, our families get along great! Greg and I have a hypothesis. We like to believe that if we had grown up in the same town, our families probably would have attended the same huge Baptist church, and since Meredith and I are the same age, our family paths would have crossed often and would therefore have been really good friends. I envision our mom’s being a part of the same bunko/keeno group. It’s that real of a hypothesis. Anyways, I say this often, but I am SO thankful for all my in-laws and that our families get along SO well. It is such a HUGE HUGE HUGE blessing as I know that in-laws can cause rifts between families. We got lucky!
 

Template by Best Web Hosting